Friday, May 22

How to Install Microsoft .NET Framework 3.5 Offline in Windows 8 and Later without Internet Connection?

Now-a-days almost all 3rd party software require Microsoft .NET Framework installed in your system. The required .NET Framework version might be different for different software and the most required .NET Framework version is 3.5 which comes preinstalled in Windows 7.
If you are using Windows 8, you might face a problem while trying to run a program which requires .NET Framework 3.5 version. Windows 8 doesn't come with .NET Framework 3.5 version. It comes with the latest .NET Framework 4.5 version preinstalled.
Whenever you try to open a program requiring .NET Framework 3.5, you get following message:
An app on your PC needs the following Windows feature:
.NET Framework 3.5 (includes .NET 2.0 and 3.0)
NET_Framework_Error_Message_Windows_8.png
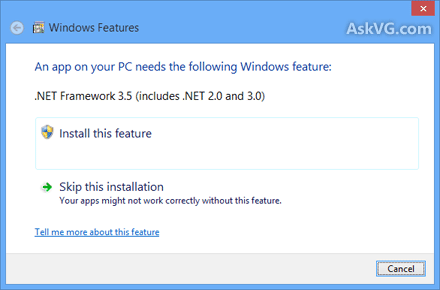
There are 2 buttons given to install the .NET Framework version or to skip the installation. If you decide to install it, Windows tries to connect to Internet to download the setup files of .NET Framework 3.5.
That's strange because Windows 8 setup contains .NET Framework 3.5 setup files but still Windows tries to connect to Internet. It would have been better and easier if Windows 8 installed the .NET Framework 3.5 without Internet connection just like it does for other Windows components such as Media Center, Internet Explorer, etc which can be installed or uninstalled using "Programs and Features" applet in Control Panel.
If you don't have an Internet connection or if you don't want to waste time and bandwidth in downloading the setup files, here is a way to install .NET Framework 3.5 offline in Windows 8.
Today in this tutorial, we'll tell you how to install .NET Framework 3.5 in Windows 8 without any need of Internet connection. You can install it offline with the help of a single command. This method requires Windows 8 setup disc or ISO file so make sure you have Windows 8 setup files with you.
So without wasting time lets start the tutorial:
1. First you'll need to copy Windows 8 setup files to your hard disk. If you have Windows 8 setup ISO copied in your system, you can mount it by right-click on it and select "Mount" option or you can extract its content using 7-Zip.
If you have Windows 8 setup disc and don't want to copy its content, its ok. Just insert the disc in your CD/DVD drive so that Windows can access its content.
2. Now open Command Prompt as Administrator as mentioned here and then provide following command:
Dism /online /enable-feature /featurename:NetFx3 /All /Source:F:\sources\sxs /LimitAccess
Here "F:" represents the CD/DVD drive letter in your system which contains Windows 8 setup disc. Replace it with the correct drive letter according to your system.
If you extracted Windows 8 setup files in a directory, replace F:\sources\sxs with the correct path.
3. As soon as you execute the above mentioned command, Windows will start installing .NET Framework 3.5 in your system and it'll not require Internet connection.
Install_NET_Framework_Offline_Windows_8.png
It'll take a few minutes and you'll get a message that the operation completed successfully.
4. That's it. Now you have installed .NET Framework 3.5 in Windows 8 without using Internet connection.
PS: If you face any problem while using this method, you can take help of following exclusive AskVG app to automatically install .NET Framework 3.5 offline in Windows 8 and 8.1:
Download Microsoft .NET Framework 3.5 Offline Installer for Windows 8 and 8.1

Tuesday, May 19

Extract source code (Java and XML) from Android APK File

Not getting any idea how to make good layout in Android activity or not getting how any application doing that things which you want in your project but you don’t know how to implement it in your APK File. So, I came here with new technology & new thinking which can make you crazy in android world.Now time for backtracking…start your time to do hacking. Do you know you can get source code of Android APK file? Time to break the code..Let’s learn step by step.
In this tutorial we will learn how to convert android APK file into source code. Android .apk file is a compressed form of a file which contains Java classes (in .dex form), XML files and all necessary files. So first we will learn how to get Java source File from android apk using dex2jar and Java decompiler tools and then we will learn how to get XML source file using apktool and apkinstall tools.To get the source code from APK file, we will need these tools:1. dex2jar
2. java decompiler
3. apktool
4. apkinstallSteps to get source: Get Java files from apk: 1. Rename the .apk file into .zip file (example SharedPr.apk into SharedPr.zip).
2. Extract SharedPr.zip file and copy classes.dex file from extracted folder.
3. Extract dex2jar.zip and paste classes.dex into dex2jar folder.
3. Open command prompt and change directory to the dex2jar folder. Then write dex2jar classes.dex and press enter. Now you will get classes.dex.dex2jar file in the same folder.
How To Get JAVA Code And XML Code From APK
Convert classes.dex to classes.dex.dex2jar
4. Now double click on jd-gui(Java decompiler) and click on open file. Then open classes.dex.dex2jar file from that folder. Now you will get class files and save all these class files (click  on file then click “save all sources” in jd-gui) by src name.
How To Get JAVA Code And XML Code From APK
classes.dex.dex2jar will be in dex2jar folder
How To Get JAVA Code And XML Code From APK
Save All Java Files
Get XML files from apk
1. Extract apktool and apkinstall in a folder (Example : New Folder).
2. Put SharedPr.apk (your apk file) in same folder (i.e New Folder).
How To Get JAVA Code And XML Code From APK
Keep Android Apk File with apktool and apkinstall
3. Open the command prompt and go to the root directory(i.e New Folder).
4. Type command on command prompt: apktool d SharedPr.apk
How To Get JAVA Code And XML Code From APK
Get All XML Files In Resource Folder
5. This will generate a folder of name SharePr in current directory (here New
Folder) and all XML files will be in res->layout folder.
How To Get JAVA Code And XML Code From APK
See All XML Files in new created Folder
Now you have source code. If you have any doubts please comment. Share and help others.
Note: Video of this post is also available on YouTube, Watch video “How to get source code (Java code and XML code) From Android APK File“.
For more related to Android tutorials see List of Android Tutorials

Tuesday, February 11

Top 10 keyboard shortcuts everyone should know

Using keyboard shortcuts can greatly increase your productivity, reduce repetitive strain, and help keep you focused. For example, highlighting text with the keyboard and pressing Ctrl + C is much faster than taking your hand from the keyboard, highlighting the text using the mouse, clicking copy from the file menu, and then putting your hand back in place on the keyboard. Below are our top 10 keyboard shortcuts we recommend everyone memorize and use.

Ctrl + C or Ctrl + Insert

Copy the highlighted text or selected item.

Ctrl + V or Shift + Insert

Paste the text or object that's in the clipboard.

Ctrl + Z and Ctrl + Y

Undo any change. For example, if you cut text, pressing this will undo it. This can also often be pressed multiple times to undo multiple changes. Pressing Ctrl + Y would redo the undo.

Ctrl + F

Open the Find in any program. This includes your Internet browser to find text on the current page.

Alt + Tab or Alt + Esc

Quickly switch between open programs moving forward.
Tip: Press Ctrl + Tab to switch between tabs in a program.
Tip: Adding the Shift key to Alt + Tab or Ctrl + Tab will move backwards. For example, if you are pressing Alt + Tab and pass the program you want to switch to, press Alt + Shift + Tab to move backwards to that program.
Tip: Windows Vista and 7 users can also press the Windows Key + Tab to switch through open programs in a full screenshot of the Window.

Ctrl + Back space and Ctrl + Left or Right arrow

Pressing Ctrl + Backspace will delete a full word at a time instead of a single character.
Holding down the Ctrl key while pressing the left or right arrow will move the cursor one word at a time instead of one character at a time. If you wanted to highlight one word at a time you can hold down Ctrl + Shift and then press the left or right arrow key to move one word at a time in that direction while highlighting each word.

Ctrl + S

While working on a document or other file in almost every program pressing Ctrl + S will save that file. This shortcut key should be used frequently anytime you're working on anything important.

Ctrl + Home or Ctrl + End

Move the cursor to the beginning or end of a document.

Ctrl + P

Print the page being viewed. For example, the document in Microsoft Word or the web page in your Internet browser.

Page Up, Space bar, and Page Down

Pressing either the page up or page down key will move that page one page at a time in that direction. When browsing the Internet pressing the space bar will also move the page down one page at a time. If you press Shift and the Space bar the page will go up a page at a time.
Tip: If you are using the space bar to go down one page at a time press the Shift key and space bar to go up one page at a time.

Top 10 computer mouse tips everyone should know

Most computer users don't take full advantage of the computer Mouse. Below are computer mouse tips and secrets that help you get the full potential of your computer mouse and increase your overall productivity while on the computer.

Shift key and mouse click

Many text editors and programs allow you to highlight all or portions of text using the Shift key and the mouse. For example, click at the beginning of a paragraph in a text editor, hold down the Shift key and click at the end of the paragraph to highlight the full paragraph.
Bonus tip: Holding down the Alt key while dragging and highlighting text in a text editor will allow you to selectively highlight text. This can be useful if your paragraph or other text is in a column.

Take full advantage of the scroll wheel

Today, everyone is familiar with a mouse wheels ability to scroll up and down on a page. However, this wheel can also do so much more, below are just a few examples.
  • The mouse wheel is not just a wheel, it can also be used as a button. Pressing down on the wheel will act like a third mouse button. This can be used to open a web page in a tab by clicking the wheel on any link and can also be used to close a tab by clicking the wheel on any open tab.
  • Zoom in and Out on a web page, word document, excel spreadsheet, etc. by holding down the Ctrl key and scrolling up to zoom in and down to zoom out.
  • Holding down the Shift key while scrolling up or down in most Internet browsers to go back and forward between web pages.
  • Some mouse wheels can be pushed left or right to also move back and forward on a web page.

Select with double and triple click

Any word can be selected by double-clicking the word. If you want to highlight the whole paragraph or sentence, click the mouse button three times on any word.
Bonus Tip: If you double-click and then drag your mouse it will highlight one word at a time.

Right-click menuUse the right-click

Take full advantage of the right-click any time you highlight text or wish to view the properties of an object. For example, if you highlight a file or text, you can right-click that highlighted item copy it and then right-click anywhere else to paste it.
Bonus Tip: If you highlight or select any file or text and then click and drag it while hold the right button, when you let go you will be given the option to move or copy that file or text. This saves you the extra step of having to right-click where you want to paste the item.
Bonus Tip: While in a browser pressing and holding Ctrl while clicking on any link will open a menu with options for that link.

Ctrl key and mouse click or highlight

While holding down the Ctrl key you can left-click to select multiple objects or highlight multiple sections of text. For example, in the below selection box if you wanted to highlight more than on eof the itmes listed you could hold down Ctrl and select each item you want highlighted.

Bonus Tip: Mozilla Firefox users can also hold down the Ctrl key and individually click on each cell in a table they wish to copy or drag their mouse down a row to select just that row or text without selecting any of the other text in that table.

Use the mouse side buttons

Many new computer mice also have buttons on the side of the mouse. These buttons can be programmed to do anything, however, by default the left-thumb button can be used to go back on a web page. This makes browsing the Internet more enjoyable since you do not need to move the mouse cursor to the browser back arrow button in order to go back a page.

Use the Windows Snap To feature

Take full advantage of the Windows mouse Snap To feature, which will automatically move your mouse to buttons that appear in a dialog box. For example, if you delete a file or close a window you may get a prompt asking you if you are sure you want to perform the task. With the Snap To feature enabled, the mouse cursor automatically moves to the Ok button, so all you will have to do is click the mouse button if you agree. This saves you the time of having to move the mouse cursor over to the Ok button and then click Ok.
To enable this feature open the Mouse properties under the Windows Control Panel and check the Snap To check box under the Pointer Options tab.
Bonus Tip: While changing this feature we also suggest looking at other available options in the Mouse settings. For example, increasing the Motion speed can also help increase your productivity while using the mouse.

Manage the open window with the mouse

Double-click the top title bar of any window to maximize a window or if it is already maximized resize it to a window. You can also double-click the icon for the window in the top-left corner of the window to close that window.

Move the mouse with your keyboard

Instead of using the mouse that came with your computer you can also enable Windows to use the number pad as a mouse.

Customize your mouse

Finally, if you have a mouse with more than two buttons, installing the included mouse software will allow you to customize the mouse even more. For example, if you don't use the side buttons to move back and forth in a web page change it to something you do more often, such as switching between open windows or opening the calculator.

Saturday, November 23

How to Create a Bootable Windows 7 Installation USB Flash Drive


information   Information
This will show you how to create a USB flash key drive that you can boot from to install Windows 7 with.
Tip   Tip
If the USB flash drive is of sufficient capacity, say 8GB, then after copying the Windows 7 installation DVD onto it, you can create a new folder (ex: Device Drivers) in the USB key and place all of your latest driver installation files in it. This way you will have them handy to manually install the drivers after installing Windows 7 from the USB key.
Note   Note
If you booted from the USB drive to install Windows 7, then you may need to change the hard drive back to being listed before the USB key in the boot order in BIOS after the computer restarts during installation to prevent the computer from booting right back into the USB key starting the installation process over and over.
warning   Warning
  • The USB key needs to be at least 4 GB in size.
  • This will delete everything on the USB key. Be sure to save anything that you do not want to lose on it somewhere else.
  • Before installing Windows 7 from the USB key, you will need to:
    • Enable Legacy USB storage detect in the BIOS.
  • When ready to install Windows 7 from the USB key:
    • Connect the USB key.
    • Restart the computer, and keep tapping the F key (see screenshot below) responsible to open the Boot Menu screen for the brand and model of your motherboard or computer until it does.
      • USB Windows 7 Installation Key Drive - Create-boot-menu.png
    • Select the USB key to boot from.
    • Start installing Windows 7.


OPTION ONE
Use a Program to Create Bootable Windows 7 Installation USB Flash Drive


Tip   Tip
If you do not have a ISO file, then you can either download one at Microsoft: Windows 7 Direct Download Links, OR use a free program like ImgBurn or ISODisk to create a ISO from your Windows 7 installation DVD.
1. For how, see the Part 2 section here: Windows 7 USB/DVD Download Tool.


OPTION TWO
Manually Create Bootable Windows 7 Installation USB Flash Drive


warning   Warning
Using this method:
  • You can only create a 64-bit Windows 7 bootable USB flash drive if your current Windows 7 installation is also 64-bit.
  • You can create a 32-bit Windows 7 bootable USB flash drive if your current Windows 7 installation is 32-bit or 64-bit.
1. Plug the USB key in.

2. If AutoPlay opens a pop-up for the USB key, then just close it.
NOTE: Make note of what the drive size is for the USB key for use in step 6 below. You can also open Computer (step 19) to see what the drive size is to. For example, mine is 3920 MB. (See screenshot below)
USB Windows 7 Installation Key Drive - Create-computer.jpg
3. Open an elevated command prompt.

4. In the elevated command prompt, type diskpart and press Enter. (See screenshot below)
Name:  Step1.jpg
Views: 55115
Size:  65.5 KB
5. In the elevated command prompt, type list disk and press Enter. (See screenshot below)
NOTE: Make note of what disk # your USB key is listed as to use in step 6 below. You can also look for the drive size (step 2) of the USB key to help ID the disk number. For example, mine is listed as Disk 1 here for the 3920 MB disk.
Name:  Step2.jpg
Views: 53183
Size:  36.3 KB
6. In the elevated command prompt, type select disk # (your USB disk #) and press Enter. (See screenshot below)
NOTE: For example, my USB key is listed as Disk 1, so I would type select disk 1 and press Enter.
Name:  Step3.jpg
Views: 48929
Size:  40.3 KB
7. In the elevated command prompt, type clean and press Enter. (See screenshot below)
Name:  Step4.jpg
Views: 49693
Size:  43.1 KB
8. In the elevated command prompt, type create partition primary and press Enter. (See screenshot below)
Name:  Step5.jpg
Views: 48836
Size:  48.4 KB
9. In the elevated command prompt, type select partition 1 and press Enter. (See screenshot below)
Name:  Step6.jpg
Views: 46368
Size:  52.6 KB
10. In the elevated command prompt, type active and press Enter. (See screenshot below)
Name:  Step7.jpg
Views: 47629
Size:  56.0 KB
11. In the elevated command prompt, type in the command below to format the USB as NTFS or FAT32, and press Enter. (See screenshot below)
NOTE: This may take a few moments to finish formatting the USB key.

Note   Note
You can substitute Windows 7 within quotes in the commands below with whatever name (drive label) you would like to have displayed for the USB drive instead.

FAT volume labels
  • If you have an UEFI instead of BIOS motherboard, then you will need to use FAT32 and not NTFS.
  • Volume labels can contain as many as 11 characters and can include spaces but no tabs.
  • Volume labels cannot contain the following characters: ? / \ | . , ; : + = [ ] < > "
  • Volume labels are stored as uppercase regardless of whether they contain lowercase letters.
NTFS volume labels
  • Volume labels can contain as many as 32 characters.
format fs=ntfs label="Windows 7" quick

OR

format fs=fat32 label="Windows 7" quick

Name:  Step8.jpg
Views: 52985
Size:  61.8 KB
12. If AutoPlay opens a pop-up for the USB key, then just close it.

13. In the elevated command prompt, type assign and press Enter. (See screenshot below)
NOTE: This will assign a new drive letter to the USB key. Make note of the new USB drive letter to use in step 22 below. For example, mine is now H.
Name:  Step9.jpg
Views: 50146
Size:  65.8 KB
14. If AutoPlay opens a pop-up for the USB key, then just close it.

15. In the elevated command prompt, type exit and press Enter. (See screenshot below)
NOTE: This will exit you from DiskPart from step 4.
USB Windows 7 Installation Key Drive - Create-step10.jpg
16. Close the elevated command prompt.

17. Insert your Windows 7 installation DVD into the DVD drive.

18. If AutoPlay opens a pop-up for the Windows 7 installation DVD, then just close it.

19. Open the Start Menu, right click on the Computer button, and click on Open.

20. Right click on the DVD drive (ex: E: ) that has the Windows 7 installation DVD in it, and click on Open. (See screenshot below)
USB Windows 7 Installation Key Drive - Create-open.jpg
21. Highlight all of the contents, right click on the highlighted contents, and click on Copy. (See screenshot below)
NOTE: You will need to copy all of the files and folders on the Windows 7 installation DVD to the USB key.
USB Windows 7 Installation Key Drive - Create-copy.jpg
22. Go back to Computer, right click on the USB key drive (ex: H ), and click on Paste. (See screenshot below)
USB Windows 7 Installation Key Drive - Create-paste.jpg
23. The contents of the Windows 7 installation DVD will now start copying over to the USB key. (See screenshot below)
NOTE: This may take a few moments to complete.
Name:  Copying.jpg
Views: 39032
Size:  60.3 KB
24. When finished, you can close the Computer window and unplug the USB key.

25. You now have a Windows 7 Installation USB key.

warning   Warning
If you have UEFI instead of BIOS motherboard, then you will need to temporarily disable Secure Boot to use the USB to install Windows. After installation is complete, you can enable Secure Boot again.

Saturday, December 15

Keyboard Shorcuts (Microsoft Windows)

Keyboard Shorcuts (Microsoft Windows)
1. CTRL+C (Copy)
2. CTRL+X (Cut)
...... 3. CTRL+V (Paste)
4. CTRL+Z (Undo)
5. DELETE (Delete)
6. SHIFT+DELETE (Delete the selected item permanently without placing the item in the Recycle Bin)
7. CTRL while dragging an item (Copy the selected item)
8. CTRL+SHIFT while dragging an item (Create a shortcut to the selected item)
9. F2 key (Rename the selected item)
10. CTRL+RIGHT ARROW (Move the insertion point to the beginning of the next word)
11. CTRL+LEFT ARROW (Move the insertion point to the beginning of the previous word)
12. CTRL+DOWN ARROW (Move the insertion point to the beginning of the next paragraph)
13. CTRL+UP ARROW (Move the insertion point to the beginning of the previous paragraph)
14. CTRL+SHIFT with any of the arrow keys (Highlight a block of text)
SHIFT with any of the arrow keys (Select more than one item in a window or on the desktop, or select text in a document)
15. CTRL+A (Select all)
16. F3 key (Search for a file or a folder)
17. ALT+ENTER (View the properties for the selected item)
18. ALT+F4 (Close the active item, or quit the active program)
19. ALT+ENTER (Display the properties of the selected object)
20. ALT+SPACEBAR (Open the shortcut menu for the active window)
21. CTRL+F4 (Close the active document in programs that enable you to have multiple documents opensimultaneou sly)
22. ALT+TAB (Switch between the open items)
23. ALT+ESC (Cycle through items in the order that they had been opened)
24. F6 key (Cycle through the screen elements in a window or on the desktop)
25. F4 key (Display the Address bar list in My Computer or Windows Explorer)
26. SHIFT+F10 (Display the shortcut menu for the selected item)
27. ALT+SPACEBAR (Display the System menu for the active window)
28. CTRL+ESC (Display the Start menu)
29. ALT+Underlined letter in a menu name (Display the corresponding menu) Underlined letter in a command name on an open menu (Perform the corresponding command)
30. F10 key (Activate the menu bar in the active program)
31. RIGHT ARROW (Open the next menu to the right, or open a submenu)
32. LEFT ARROW (Open the next menu to the left, or close a submenu)
33. F5 key (Update the active window)
34. BACKSPACE (View the folder onelevel up in My Computer or Windows Explorer)
35. ESC (Cancel the current task)
36. SHIFT when you insert a CD-ROMinto the CD-ROM drive (Prevent the CD-ROM from automatically playing)
Dialog Box - Keyboard Shortcuts
1. CTRL+TAB (Move forward through the tabs)
2. CTRL+SHIFT+TAB (Move backward through the tabs)
3. TAB (Move forward through the options)
4. SHIFT+TAB (Move backward through the options)
5. ALT+Underlined letter (Perform the corresponding command or select the corresponding option)
6. ENTER (Perform the command for the active option or button)
7. SPACEBAR (Select or clear the check box if the active option is a check box)
8. Arrow keys (Select a button if the active option is a group of option buttons)
9. F1 key (Display Help)
10. F4 key (Display the items in the active list)
11. BACKSPACE (Open a folder one level up if a folder is selected in the Save As or Open dialog box)

Microsoft Natural Keyboard Shortcuts
1. Windows Logo (Display or hide the Start menu)
2. Windows Logo+BREAK (Display the System Properties dialog box)
3. Windows Logo+D (Display the desktop)
4. Windows Logo+M (Minimize all of the windows)
5. Windows Logo+SHIFT+M (Restorethe minimized windows)
6. Windows Logo+E (Open My Computer)
7. Windows Logo+F (Search for a file or a folder)
8. CTRL+Windows Logo+F (Search for computers)
9. Windows Logo+F1 (Display Windows Help)
10. Windows Logo+ L (Lock the keyboard)
11. Windows Logo+R (Open the Run dialog box)
12. Windows Logo+U (Open Utility Manager)
13. Accessibility Keyboard Shortcuts
14. Right SHIFT for eight seconds (Switch FilterKeys either on or off)
15. Left ALT+left SHIFT+PRINT SCREEN (Switch High Contrast either on or off)
16. Left ALT+left SHIFT+NUM LOCK (Switch the MouseKeys either on or off)
17. SHIFT five times (Switch the StickyKeys either on or off)
18. NUM LOCK for five seconds (Switch the ToggleKeys either on or off)
19. Windows Logo +U (Open Utility Manager)
20. Windows Explorer Keyboard Shortcuts
21. END (Display the bottom of the active window)
22. HOME (Display the top of the active window)
23. NUM LOCK+Asterisk sign (*) (Display all of the subfolders that are under the selected folder)
24. NUM LOCK+Plus sign (+) (Display the contents of the selected folder)
25. NUM LOCK+Minus sign (-) (Collapse the selected folder)
26. LEFT ARROW (Collapse the current selection if it is expanded, or select the parent folder)
27. RIGHT ARROW (Display the current selection if it is collapsed, or select the first subfolder)
Shortcut Keys for Character Map
After you double-click a character on the grid of characters, you can move through the grid by using the keyboard shortcuts:
1. RIGHT ARROW (Move to the rightor to the beginning of the next line)
2. LEFT ARROW (Move to the left orto the end of the previous line)
3. UP ARROW (Move up one row)
4. DOWN ARROW (Move down one row)
5. PAGE UP (Move up one screen at a time)
6. PAGE DOWN (Move down one screen at a time)
7. HOME (Move to the beginning of the line)
8. END (Move to the end of the line)
9. CTRL+HOME (Move to the first character)
10. CTRL+END (Move to the last character)
11. SPACEBAR (Switch between Enlarged and Normal mode when a character is selected)
Microsoft Management Console (MMC)
Main Window Keyboard Shortcuts
1. CTRL+O (Open a saved console)
2. CTRL+N (Open a new console)
3. CTRL+S (Save the open console)
4. CTRL+M (Add or remove a console item)
5. CTRL+W (Open a new window)
6. F5 key (Update the content of all console windows)
7. ALT+SPACEBAR (Display the MMC window menu)
8. ALT+F4 (Close the console)
9. ALT+A (Display the Action menu)
10. ALT+V (Display the View menu)
11. ALT+F (Display the File menu)
12. ALT+O (Display the Favorites menu)

MMC Console Window Keyboard Shortcuts
1. CTRL+P (Print the current page or active pane)
2. ALT+Minus sign (-) (Display the window menu for the active console window)
3. SHIFT+F10 (Display the Action shortcut menu for the selected item)
4. F1 key (Open the Help topic, if any, for the selected item)
5. F5 key (Update the content of all console windows)
6. CTRL+F10 (Maximize the active console window)
7. CTRL+F5 (Restore the active console window)
8. ALT+ENTER (Display the Properties dialog box, if any, for theselected item)
9. F2 key (Rename the selected item)
10. CTRL+F4 (Close the active console window. When a console has only one console window, this shortcut closes the console)
Remote Desktop Connection Navigation
1. CTRL+ALT+END (Open the Microsoft Windows NT Security dialog box)
2. ALT+PAGE UP (Switch between programs from left to right)
3. ALT+PAGE DOWN (Switch between programs from right to left)
4. ALT+INSERT (Cycle through the programs in most recently used order)
5. ALT+HOME (Display the Start menu)
6. CTRL+ALT+BREAK (Switch the client computer between a window and a full screen)
7. ALT+DELETE (Display the Windows menu)
8. CTRL+ALT+Minus sign (-) (Place a snapshot of the active window in the client on the Terminal server clipboard and provide the same functionality as pressing PRINT SCREEN on a local computer.)
9. CTRL+ALT+Plus sign (+) (Place asnapshot of the entire client window area on the Terminal server clipboardand provide the same functionality aspressing ALT+PRINT SCREEN on a local computer.)

Microsoft Internet Explorer Keyboard Shortcuts
1. CTRL+B (Open the Organize Favorites dialog box)
2. CTRL+E (Open the Search bar)
3. CTRL+F (Start the Find utility)
4. CTRL+H (Open the History bar)
5. CTRL+I (Open the Favorites bar)
6. CTRL+L (Open the Open dialog box)
7. CTRL+N (Start another instance of the browser with the same Web address)
8. CTRL+O (Open the Open dialog box,the same as CTRL+L)
9. CTRL+P (Open the Print dialog box)
10. CTRL+R (Update the current Web )

Saturday, September 22

Free Utility To Make Your USB Pen Drive Bootable

If you are an fairly advanced computer user, at times you may need to boot from devices other then the default hard-disk, mainly to troubleshoot virus infections and other critical operating-system related issues, I had shared tips on how to make bootable cd for performing advance system tasks on windows. Today I will share few utilities enabling you to create bootable USB pen drives with ease, you need to have Motherboard/BIOS with USB boot support for this to work.
MakeBootable is an free and simple-to-use utility to make your Pen Drive act as a boot-up disk without erasing any data on the device. It consists of a single executable file and requires no installation, However the utility will only work on USB device's using Phison’s chip solution and FAT file-system only (you can re-format your drives to FAT easily).
Bootable USB
Direct Download : Make_bootable.zip (465Kb)
If the above utility fails to recognize your USB drive you can download and use the HP USB Format Utility and HP USB Boot utility, They work with other brands of flash drives as well, The best software for creating bootable flash drives with the most extensive support of drives and advance options would be "FlashBoot" from PrimeExpert but its not free and costs around $31, you can download and try the demo version.
FlashBoot
There are quite a few other manual methods to make usb devices bootable as discussed here, once you succeed in making your USB drive bootable using any of the method discussed above, You need to change the boot-up setting in the system BIOS as described below to boot using your portable device:
  1. With your device inserted, restart the machine.
  2. Enter the BIOS setup menu to change the boot device setting.
  3. If the boot-up files are created in the USB drive, select USB-HDD or USB-ZIP (preferred). If the boot-up files are created in the floppy drive of your device, select USB-FDD (for Pen Drive that supports security mode).
  4. USB Boot BIOS Setting
  5. Save and exit the BIOS setup. You should be able to boot up with you USB device.